Varnishing Oil Paintings with Gamblin Gamvar

In the last few days I've been varnishing all of the paintings I've done in the last one and half years since I began using oil paints. Most of the paintings are small in size, 6x8s or 5x7s but I also have some 12x16s - and just recently within the past month or two I've begun painting larger - 18x24, 20x20, and 24x36. But I started out only varnishing the smaller paintings because I wasn't sure how to go about it.. and the reason is because if you search "varnishing oil paintings" online, you will come across so many different explanations and solutions and problems that you will cry and never want to ever varnish your paintings. But since I don't want you to cry, I will share with you my process of varnishing my oil paintings with Gamblin's Gamvar. Gamblin recently updated their video explaining how to use their varnishes - which is helpful but it's hard to learn everything from a short video. The best way to learn is to jump in and do it yourself, so that's what I did.
UPDATE [Regarding Gamvar & Acrylic Paintings]: I was unsure about using Gamvar with acrylic paintings even though Gamblin states that it can be used on them. My main concern was that if the varnish ever needs to be removed, will the Gamsol destroy the acrylic paint layer? I did a small test using a q-tip dipped in Gamsol and lightly scrubbed a small portion of an old acrylic painting. No paint was removed and I can see no ill effects from the Gamsol. From my standpoint, it would be safe to say that Gamvar would also be a good choice for acrylic paintings as well.
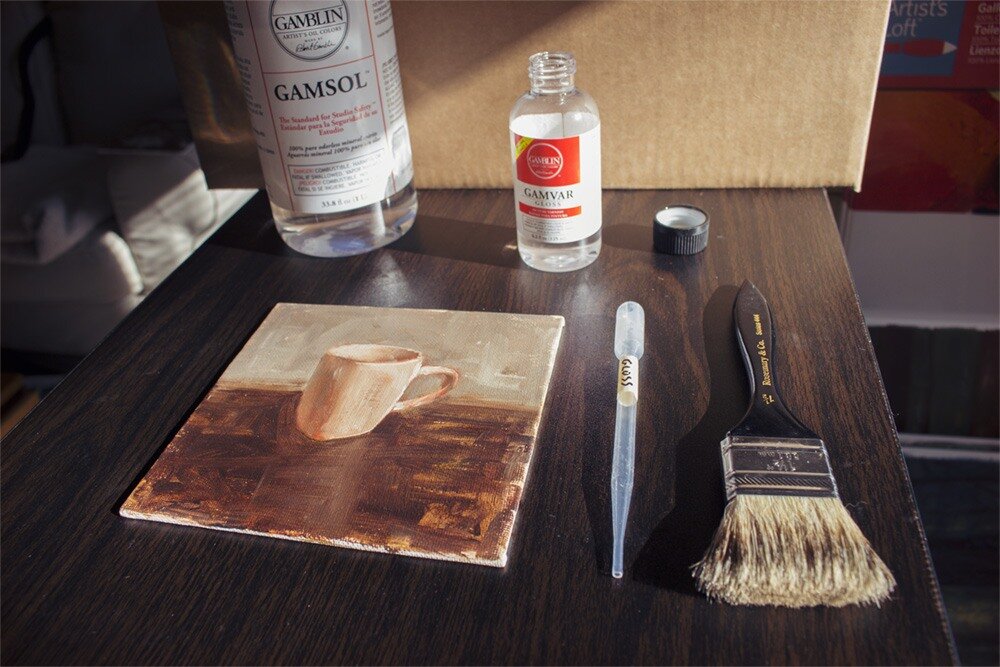
Materials
Before varnishing, I needed a few materials to get started such as:
A brush dedicated only for varnishing [Rosemary Series #444 Blender Brush or Omega Varnish Brush - both work fine for me]
Gamvar Varnish [Gloss, Satin or Matte - Up to you. I use Gloss but also experiment with a 1:1 mixture of Gloss/Satin.]
Eye Droppers [I'll explain why I use these in a minute] Buy them here
Gamsol [This isn't necessary but good to have around just in case - I did not use it in this demonstration]
Once I had all of these things, I began varnishing. Of course, before I started I had seen videos from other artists using Gamvar and how they used it, etc. I had read a lot of articles about varnishing, so I knew possible problems and what not to do.
Varnishing Process
I start out by selecting a painting for varnishing. Then, I inspect the painting for large hairs and dust on the surface and when necessary I use a clean, dry brush to dust it off.
Next, I use an eyedropper to place a few drops of varnish onto my painting. For a small painting - 6x8 or 5x7 - I use 8 to 10 drops and evenly place the drops across the surface of the painting.

I then use my varnish brush to gently scrub the varnish evenly across the entire painting surface. A little varnish can go a long way and it's important to not use too much. Gamblin also states on their website that it is better to apply thin, multiple layers [if desired] - rather than one thick layer.

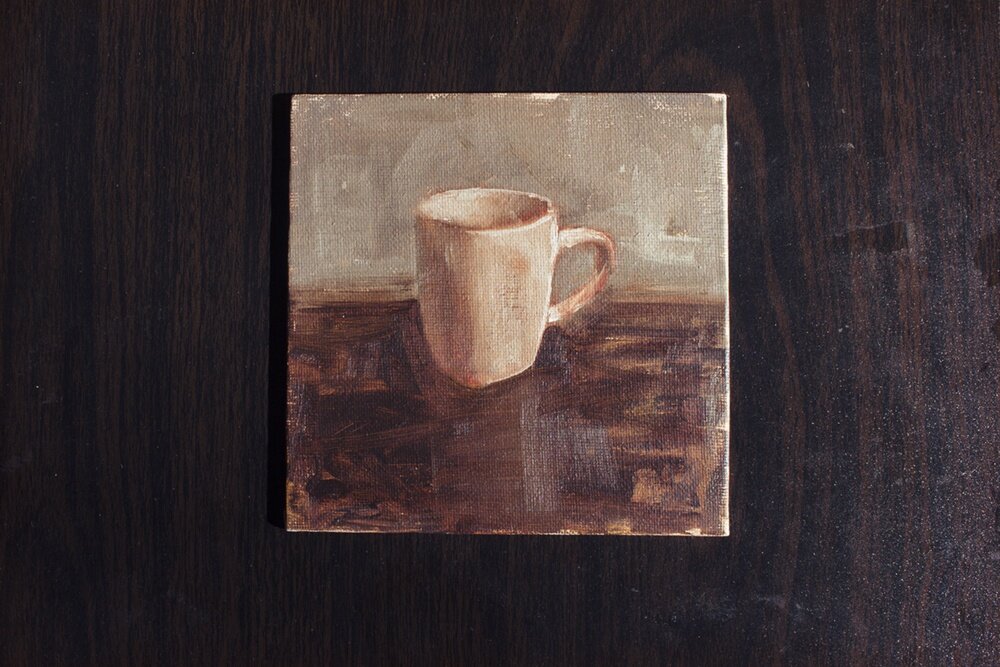
Here's a final shot of the painting after being varnished. Below I will show a before and after so you can see the subtle but important differences.

Before and After. You can see the after photo on the right - darks enhanced as well as color temperature. The painting and its colors are brought back to life.

Post-Varnish
So now that the painting is varnished, I can place it on my drying rack vertically to allow it to dry over the next 2-3 days. Since it only takes a minimal amount of varnish to cover a painting, I don't have to worry about drips or runs, etc., which means I can let it dry vertically instead of laying flat and collecting unwanted dust and dirt on the surface as it dries. Also, if I mess something up - I can always easily remove Gamvar with Gamsol. This is why I use Gamvar - I find it to be a quality varnish and quite user-friendly.
Troubleshooting Varnishing Mistakes
I've seen so many videos on Instagram of artists varnishing their paintings and they literally pour the varnish onto the painting straight from the bottle. This is definitely not a good way to go about it. Here's why:
You can't accurately control how much varnish spills out
Varnish is sticky and it will no doubt drip down the side of the bottle and get everywhere
You end up using way too much varnish
The way I get around this is by using an eye dropper to control the amount of varnish I wish to use and it keeps everything much cleaner. Also, it makes it much easier to add Gamsol to the varnish when needed. In some cases I've noticed that the varnish wasn't covering certain areas as much as I wanted, so I add between 10-20% Gamsol to the varnish on the painting just to thin it down a bit and help it spread and cover better. So in terms of my eye dropper, that means 1-2 drops for every 10 drops of varnish - simple.
Read more about Troubleshooting with Gamvar here: https://www.gamblincolors.com/varnishing-help/

Retouch Varnish
You can also use Gamsol to create a retouch varnish with Gamvar but I suggest doing this in larger amounts and mixing it together in a small mason jar to have it on hand. The ratios I've seen online are anywhere from 1:3 to 1:5 of Gamvar to Gamsol. Personally, I mixed up a retouch varnish of 1 part Gamvar to 4 parts Gamsol, this seemed to work just fine.
Why use Retouch Varnish? I use it when I have a painting that is completely dry and parts of it dried glossy while other parts dried flat and matte. The retouch varnish helps to unify the surface quality of the painting a bit. I use the retouch varnish first and allow it to dry for a couple days to a week - it's usually dry sooner than that. Then, if I'm happy with the result, I will put a final varnish on using the steps outlined above.
Why Varnish?
So what's the point of varnishing at all? Well, there are a few reasons. Historically it was used to protect the painting from dirt and particularly smoke - since everyone used wood stoves, etc. Nowadays, that isn't much of a concern for us thankfully but it does help to keep dirt and dust off the surface of the painting. Other reasons are for aesthetic purposes such as bringing out the true colors of the painting. When a painting dries, some areas become dull and matte - usually the darker colors or thinner areas of the painting but it can happen to any area or color. Adding a gloss varnish or gloss/satin varnish will make the darks dark again and will give the appearance the painting had when the paint was wet. It brings it back to life.
[Note: Some of the links in the paragraphs above are affiliate links which help me to create new content and keep this site running. I am not sponsored by any brands or companies.]


I’m an artist exploring creativity, mindset, and the practice of making art over a lifetime. I share my work through writing, courses, and original paintings.