Learn How to Paint a Mountain Landscape with Watercolors

Alaskan Mountain Landscape Painting Tutorial
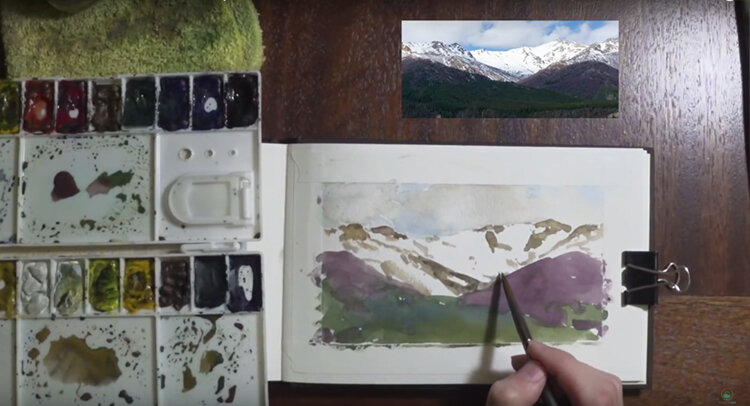
I painted this watercolor from a photograph that I took on a trip to Alaska in early May. This particular scene is of some mountains near the Denali Park Entrance.
My sketchbook is a small Strathmore watercolor book that I found at a local Michael’s store near me, but you can also find many similar and better ones on Amazon. The rest of my materials are listed below:
Palette: https://amzn.to/3hf2ObO
Sketchbook: https://amzn.to/3bgvUDW
Water Cups: https://amzn.to/3bbRDwP
Tape: https://amzn.to/3ybvwk2
Paint: https://amzn.to/33vEaLV
Pencils: https://amzn.to/3biPkYL
Below you can watch the entire video (16 mins) where I paint this landscape in real-time and explain things or if you’re pressed for time, just scroll below and check out the photos and explanations there. Hope you enjoy this tutorial!
Be sure to leave me a comment or share it if you found it helpful!
1. I start out by taping the edges of my sketchbook - this is optional of course, but in the end it will give you some crisp lines and a nice white border. Then I do a quick sketch of the overall composition in pencil lightly. Be sure to get this part as correct as possible in the beginning - there’s no way of fixing it once the painting starts!

2. I then start painting directly as possible starting with one of the lightest areas - the sky. I plan to leave the brightest part (the snow of the mountains) the white of the paper with no paint at all. I paint all of the sky wet-into-wet in one go to create soft edges of clouds against the sky, no harsh lines.

3. As the sky dries, I move onto the lower part of the painting - the trees in the foreground. I treat these as one big mass of color and value. I make sure to create interesting shapes here and also use different color mixtures as I go along - adding more blue in some areas and more yellow greens in other areas. All wet-into-wet mixtures to create beautiful effects.

4. I continue branching out from the greenery and go into more of the magenta’s and purples of the mountain side. I put this part down while the green is still wet but I’m careful to not let it blend together too much, limiting the amount of water used.

5. Before moving on, I make sure the sky is dry as I don’t want any of the next painting stage to bleed into the sky. I start creating rock shapes on the mountain with a dark grey-ish brown. I think in terms of large shapes and then move to smaller shapes. Less is more, it’s quite easy to over-do it.
Below is the finished painting once I removed tape. Hope you found this tutorial helpful! Be sure to share this if you found it helpful :) or leave me a comment below.


I’m an artist exploring creativity, mindset, and the practice of making art over a lifetime. I share my work through writing, courses, and original paintings.